
Introduction to React Router and Single-Page Applications
React Router is a brilliant library that allows you to create Single-Page Applications with the help of some hooks and components provided by itself.


Hey everyone! Hope you're having a great day :) If not, then I genuinely hope everything gets better asap!
In this article I will introduce you to React Router, a library that allows you to create Single-Page Applications (SPA).
If you're still not that familiar with what exactly an SPA is, well... they are apps that don't require page refreshing to show content. A single document is loaded, and all the other content is shown dynamically.
Let's now get our hands dirty with React Router:
Table of Contents:
- React Router
- Installation
- Import
<Router>component<Route>component- Displaying an Error Page
<Switch>component- Children and Component Props
- Children Prop
- Component Prop
<Link>component- Difference between
<Link>and<a> - Implementing Navbars
<NavLink>component- Working with Nested Routes
useParamhookuseRouteMatchhook- Big Issue Regarding Routes on App Deployment
<HashRouter>component- Source Code Used
React Router
To make a Single-Page Application, you can use an external package such as React Router, which is the most popular routing library in React.
It runs wherever React runs: web, React Native, and on the server with Node.js.
Installation
To install React Router as a dependency in your React web app, use npm install react-router-dom for npm, or yarn add react-router-dom for yarn.
Import
Once you're done with the installation, now you have to import BrowserRouter from react-router-dom, and a common practice is to give it an alias: Router. Also, import Route, and Switch components . Each one of them will be explained as we go deep into the article.
import { BrowserRouter as Router, Route, Switch } from ‘react-router-dom’
App Building
NOTE: I'll work with a simple app just so you can understand every single thing much better. The source code will be available at the end of the article :)
Also, take into account that this guide is done based on the version 5.3.0 of React Router. Things may change in another version.
<Router>
The first thing to be done is to wrap your whole application inside a <Router> component.
<Router>
  {Your app goes here}
</Router>
Now what comes next is the process of declaring the routes. This is where <Route> comes into action.
<Route>
<Route> is a component that includes several properties, and the most important one is the path, which is where you type the address (URL) to the component you want to display. Inside a <Route>, you have to place the component to be shown.
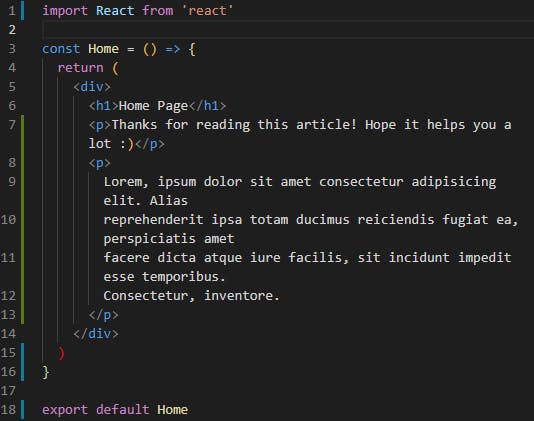
Bear in mind that you can either just write the JSX right there or create a component separately, then import it and use it as shown below.
NOTE: If you have a Home page and you want its url to be the same as the domain (example.com), just type a forward slash ( / ).
index.js
<Router>
        <Route path='/'> // www.example.com
            <Home/>
        </Route>
        <Route path='/about'> // www.example.com/about
            <About/>
        </Route>
        <Route path='/reacthooks'> // www.example.com/reacthooks
            <ReactHooks/>
        </Route>
</Router>
The issue with passing only a forward slash as the path is that, for instance, everytime you go to /about, you’ll get both <Home/> and <About/>, and if you go to /reacthooks, you’ll get both <Home/> and <ReactHooks/>.
That happens because, technically, the path to <Home> matches that of <About> and <People> because they all start with a forward slash. So, to fix that, you need to add an attribute called exact, which means that it will render only the component that matches the exact path:
<Router>
        <Route exact path='/'>
            <Home/>
        </Route>
        <Route path='/about'>
            <About/>
        </Route>
        <Route path='/reacthooks'>
            <ReactHooks/>
        </Route>
</Router>
Note how this attribute is not applied to all <Route>s. It is just not necessary for all of them because it is enough with applying it to the conflicting route, which in this case would be the one with '/' as the path.
The attribute exact is mostly used when working with nested routes: that is, you have, let’s say, a <Topics/> component (page) that contains different topics categories (environment, economics, politics, etc), and the path to each one of them is /topics/environment, /topics/economics, etc. If you don’t add exact to, at least, the parent component (<Topics/>), then you go to /topics/environment, you will get both <Topic/> and <Environment/> in the same page, and so on with the rest.
However, it should be used carefully because, otherwise, your app won't work as expected. I have an example of this in another section.
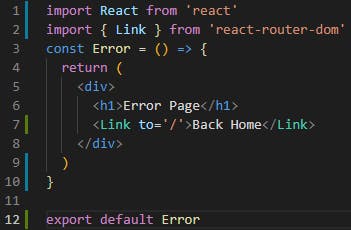
Displaying an Error Page
If you want to display an Error page every time the user navigates to a wrong URL, pass an asterisk (*) as the path to the <Error/> component (imagining it is called like that):
<Route path='*'>
        <Error/>
</Route>
What this '*' does is that it will match ALL URLs. And… yes, you got it right! It will also match /about and will display both components, and the same thing with any other URL. Here’s where we make use of the <Switch> component to fix this incovenient.
<Switch>
<Switch> checks its children <Route>s and renders the first one that matches the URL that is being passed in.
This means that you have to put all of your <Route>s inside a <Switch> component as shown below:
<Router>
        <Switch>
            <Route exact path='/'>
                 <Home/>
            </Route>
            <Route path='/about'>
                 <About/>
            </Route>
            <Route path='/reacthooks'>
                 <ReactHooks/>
            </Route>
            <Route path='*'>
                 <Error/>
            </Route>
        <Switch/>
</Router>
The <Route> with a '*' as the path is always recommended to be placed at the last spot so that component isn't rendered all the time, no matter if the user is heading to /about or /reacthooks.
Children and Component props
If you’re looking to make your app look less messy, like it’s getting bigger and bigger in terms of having lots of lines, you can write the <Route> component as a self-closing tag and use one of the properties that receive the component to be rendered. They are children and component, and they have a slight difference:
Children prop
When using children as the prop to display a component, you should write the <Route> self-closing tag like this:
<Route path='/example' children={<Example />} />
As you can see, you pass in the component as a self-closing tag, as usual.
Now, let’s see what it is like when using the component property.
Component prop
With this prop, you won’t pass in the component as a self-closing tag. Instead, you’re going to pass it in as if it were a function or a variable, just like this:
<Route path='example' component={Example} />
<Link>
<Link> renders an <a> element with its respective href behind the scenes. It is, basically, a component provided by react-router-dom that contains several prop types that you can use as you wish. One of those property types is the to property, which indicates the href.
To use it, you have to import it first from react-router-dom:
import { Link } from ‘react-router-dom’
Then, in your return, do:
<Link to='/'>Go to Home Page</Link>
This will direct to the <Home/> page because it matches its path ( / ).
Difference between <Link> and <a>
It is important to know that there’s a difference between this component and <a> elements, which is that, <a> elements refresh the page, but <Link> components don’t. Simple as that.
So, it is supposed that, when building Single Page Applications, the page never gets refreshed. That’s why, <Link> is the best option for this case.
Implementing Navbars
If you want to implement a navbar in your app and keep it visible in every single page, you have to place it above the <Switch> component, so it doesn’t cause any conflict with the <Route>s:
<Router>
   <Navbar/>
   <Switch>
     {Insert <Route>s here}
   </Switch>
</Router>
Now, as you already know about the component, let me tell you that there’s a similar component that comes with a special attribute. Allow me to introduce you to <NavLink>.
<NavLink>
It works similarly to <Link> and the difference is that <NavLink> allows you to apply a style to that link when the current URL matches its path by passing a CSS class to an attribute called activeClassName.
Imagine you have a class called 'active' that changes the color of the text:
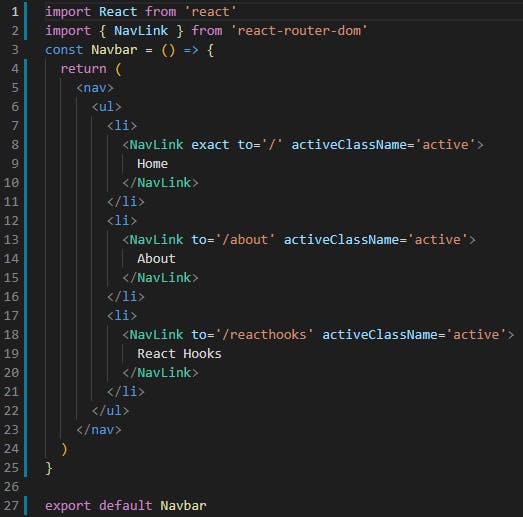
<li>
  <NavLink exact to=’/’ activeClassName=’active’>
     Home
  </NavLink>
</li>
<li>
   <NavLink to='/about' activeClassName='active'>
     About
   </NavLink>
</li>
<li>
   <NavLink to='/people' activeClassName='active'>
     People
   </NavLink>
</li>
Now, if you, for instance, head over to /about, the About link will have that style applied, as shown below: 
If you head over to /contact, the Contact link will then be styled that same way. And so on with any other links you create.
NOTE: You’re free to use either <Link> or <NavLink>.
Working with Nested Routes
If you're not sure what a nested route is, well, they look like this: /parentURL/childURL. For example, in this one: twitter.com/JuanMendozaDev/media, /JuanMendozaDev would be the parent, and /JuanMendozaDev/media would be the children. This makes a nested route.
To create nested routes, react-router-dom provides a hook called useParam.
useParam
NOTE: Before continuing, just so you know, now you have to work with 2 components: the parent one (in this case <ReactHooks/>) and the child one (in this case, a new one called <Hook/>)
This hook allows you to work with URL parameters. To get into context, an URL parameter is a parameter whose value is set up dynamically in the URL.
They can be declared by typing a colon and then a name for that parameter in the path property. Then, once React Router "reads" that colon, it immediately knows it is a parameter.
Keep in mind that this <Route> should be placed in the parent component, right after another <Route> that wraps that component's content. You will see this in a while.
As I'll refer to this particular code line in a while, let's call it ROUTE URL PARAM.
<Route path='/reacthooks/:id' component={Hook} />
Here, /reacthooks is the parentURL (<ReactHooks/> is shown here), and /:id is the URL parameter, the childURL (<Hook/> is shown here).
Then, you have to make use of useParams() in the component (child component) you want to display with that URL.
Imagining you are already in your children component file (<Hook/>), you have to import the hook first as always to be able to use it:
import { useParams } from ‘react-router-dom’
Now, if you console.log(useParams()), you’ll see that it returns an object that contains the URL parameter you passed in through the path property and its value.
So, to make life easier when working with that object, just destructure it :)
const { id } = useParams()
As we used /:id as the URL parameter above, then useParams() will return it with its value.
Now, to illustrate the use of useParams, let's take an objects array that contains information about some React Hooks and this component will be called <Hook/>.
reactHooks.js (object)
export const reactHooks = [
  { id: 'use-state', name: 'useState Hook', text: 'hello, im use state hook!' },
  { id: 'use-effect', name: 'useEffect Hook', text: 'hello,  this is use effect hook!'},
  { id: 'use-ref', name: 'useRef Hook', text: 'hello im  use ref :)' },
  { id: 'use-reducer', name: 'useReducer Hook', text: 'hello, the last one, use reducer...'},
]
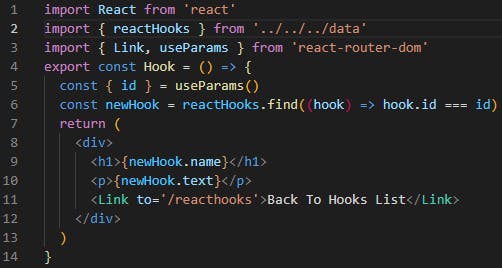
Hook.js (child component)
To show the right object when the user navigates to their respective URLs, you need to use the .find array method with the parameter from useParams, just like this:
const newHook = reactHooks.find((hook) => hook.id === id)
return (
    <div>
      <h1>{newHook.name</h1>
      <p>{newHook.text}</p>
      <Link to='/reacthooks'>Back To Hooks List</Link>
    </div>
)
The code above the return means that you want to find the object in which there is a property (hook.id) whose value is the same as the value of the parameter from useParams (id). In the return, you see there's a <Link>, well, that means you can add them wherever you want (remember to import them) in your app. As for this one, it sends the user back to the parent page (/reacthooks).
ReactHooks.js (parent component)
To create a link that sends the user to a specific nested route, you can just hard code the URL and add the parameter, just like we did with 'ROUTE URL PARAM' above:
<Link to={`/reacthooks/${hook.id}`}>Text here</Link>
However, this way is not recommended when working with nested routes. Instead, there's another important hook provided by react-router-dom: useRouteMatch.
useRouteMatch
This hook returns an object with 4 values of which you'll use two when nesting routes: path and url.
There is a difference between them:
- path allows you to create relative routes (the ones you declare with
<Route>), - and url allows you to create relative links (the ones you declare either with
<Link>or<NavLink>).
Long story short, path is used with <Route> and url is used with <Link> or <NavLink>.
To use this hook, import it from the same react-router-dom:
import { useRouteMatch } from 'react-router-dom'
IMPORTANT NOTE: When working with nested routes, it is recommended not to add the exact attribute in the parent <Route> you create in the index.js file. Otherwise, your nested components might not be displayed at all! So, instead of adding that attribute there, you better add it in a new <Route> which will wrap your parent component's content. Let me illustrate this with code:
First, head over to the parent component file (ReactHooks.js in this case), then wrap its content inside a new <Route> and set its path to equal the returned path value from useRouteMatch.
const ReactHooks = () => {
  let { path, url } = useRouteMatch()
  return (
    <Switch>
      <Route exact path={path}>
        <div>
          <h1>React Hooks Page</h1>
          {reactHooks.map((hook) => {
            return (
              <div key={hook.id}>
                <h4>{hook.name}</h4>
                <Link to={`${url}/${hook.id}`}>Learn More</Link>
              </div>
            )
          })}
        </div>
      </Route>
   </Switch>
As you can see, path was used with <Route> and url with the <Link> that directs the user to the child page. Also, the .map method was used to show every single hook name from the reactHooks objects array.
Now, as you're working with nested routes, you have to insert a new <Route> below the one that contains the parent component's content. This new <Route> will be the path to the child component.
<Route path={`${path}/:id`} component={Hook} />
And everything together would look like this:
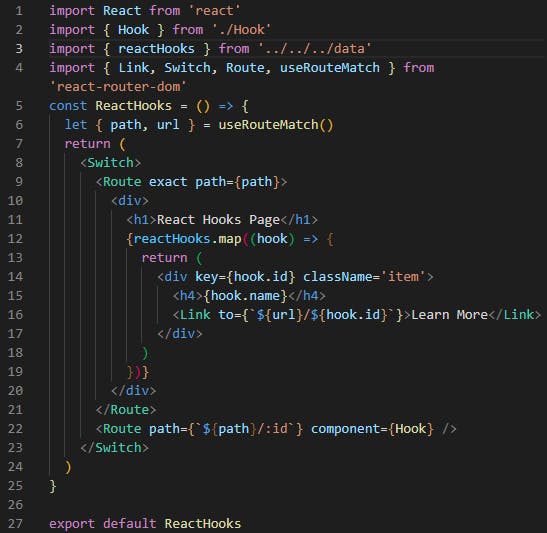
const ReactHooks = () => {
  let { path, url } = useRouteMatch()
  return (
    <Switch>
      <Route exact path={path}> //parent page
        <div>
          <h1>React Hooks Page</h1>
          {reactHooks.map((hook) => {
            return (
              <div key={hook.id}>
                <h4>{hook.name}</h4>
                <Link to={`${url}/${hook.id}`}>Learn More</Link>
              </div>
            )
          })}
        </div>
      </Route>
      <Route path={`${path}/:id`} component={Hook} /> // child page
   </Switch>
This would look like this at /reacthooks (I added some CSS to everything obviously):

Big Issue Regarding Routes on App Deployment
When you run npm run build to then deploy your React app, there's a big issue any user that navigates through your page will most probably face. Let me explain this issue to you in a more detailed way.
Imagine you already deployed your app, then someone goes to it and starts navigating through the different links. This person finds a specific section so interesting (yourpage.com/interesting-section) and wants to check it again another day. So, he/she saves the link somewhere. The next day, this person opens the browser and pastes the link (yourpage.com/interesting-section), but... suddenly an error pops up! Like this:
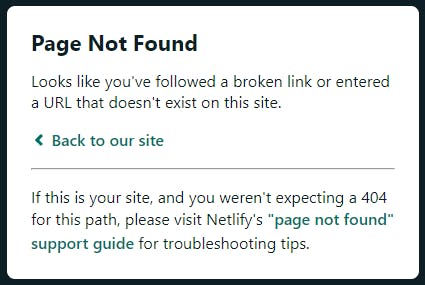
This also happens even if the user reloads the page! This is sooo bad, isn't it?
This is because what React Router somehow does is manipulate manually the URL and renders the content conditionally depending on the route. So, to make this work properly, there's Express.js from Node.js, as well as Next.js and they both provide Server Side Rendering.
However, if your app doesn't actually depend on a backend as it is only working with APIs (for example), and you want the user to be able to navigate the way that was mentioned above, then there's an alternative to <BrowserRouter> whose purpose is to enable this functionality: <HashRouter>.
<HashRouter>
What this component does is add a hashtag (#) to your URL (yourpage.com/#) and it allows your Single-Page App's UI to keep in sync with the URL.
First, import it along with the other components:
import { HashRouter, Route, Switch } from 'react-router-dom'
Note how BrowserRouter is not needed anymore because you'll be using HashRouter in its place.
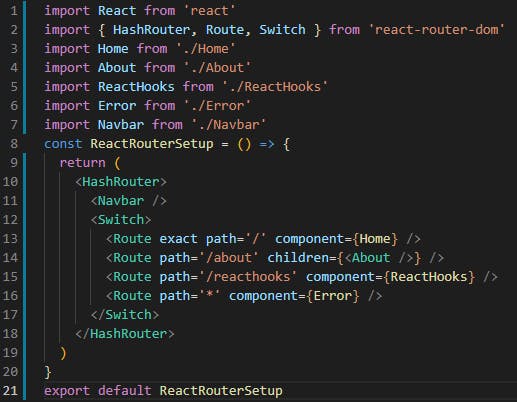
Then, wrap all the content inside of it, just like with <Router>. So, the return of index.js would now be:
<HashRouter>
      <Navbar />
      <Switch>
        <Route exact path='/' component={Home} />
        <Route path='/about' children={<About />} />
        <Route path='/reacthooks' component={ReactHooks} />
        <Route path='*' component={Error} />
      </Switch>
</HashRouter>
Now, your app's URL would be:
- yourpage.com/# => main page (
<Home/>component), - yourpage.com/#/about => about page (
<About/>component), - yourpage.com/#/reacthooks => react hooks page (
<ReactHooks/>component) - yourpage.com/#/reacthooks/:id => every hooks page (
<Hook>component).
Source Code Used In This Article
As promised, I'm providing the whole source code for further reference :)
index.js
Navbar.js
Home.js
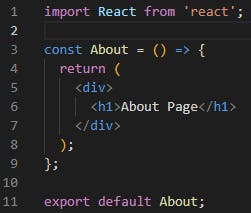
About.js
ReactHooks.js
Hook.js
Error.js
This was a long article which I hope you found very helpful! I appreciate the time you took to read it!
You can also find me on Twitter.